 |
 |
||
 |
 |
If you love Willys vehicles and you've never heard of the WillysTech e-mail list, then I have a treat for you. These guys are not all die-hard restoration fans, although we do have a few of those on the list. Mostly we are a bunch of guys and gals that like Willys vehicles, and are doing our best to keep them on the roads. We do that in whatever forms necessary, down to and including V-8 swaps and axle changes. You can see some of their postings down near the bottom of this page on the left, at WillysTech FAQs for Pickups.
In the mean time I hope you have a great time reading my triumphs and heartbreaks in dealing with my Willys Pickup. It's been a start and stop journey that seems to have no foreseeable end. I will try to chronicle the gradual regeneration of my old truck as I go along. Have fun and let me know what you think of my page.
Rick StiversThe Great Discovery
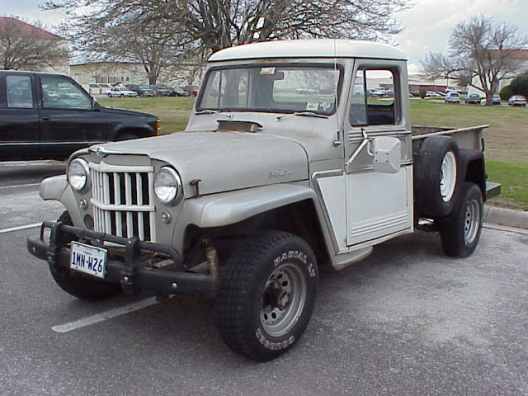
I didn't even know Willys made pickups, but I still knew it was a Willys the first time I saw it. I was picking up my daughter's friend Frank to go to a DC Talk concert. I'd never met Frank before, so I was interested in knowing what type of person my 16-year-old daughter was choosing to friends with. When we pulled up in front of his house, I'm afraid I forgot my concerns about this guys character. Parked out front was a 1962 Willys Pickup. I figured, "How bad could Frank be if he had such a wonderful truck?" The Willys was beginning to show signs of wear and neglect. It was primarily used to haul a 4 wheeler to the country and back. Like I said before, I didn't even know that Willys made pickups, but I could easily recognize the distinct Jeep front end. The vertical slats, round headlights, and dropped down narrow parking lights. It was all Jeep. Within the first two minutes of meeting Frank I had broken down and asked the inevitable question Willys owners get asked. "Do you want to sell it?" His response was quick and decisive, "No way man. That was my Grandpas truck. He bought it brand new back in 62. I'll keep it forever." :-(
I was disappointed, but having owned my 1948 CJ-2A since 1975 I understood how powerful the heirloom factor could be. Just being near the old truck was a joy and I was often found parked on his street just gazing at it. Never being one to stay away from what I want, I offered to work on it with him anytime he wanted for free. This way I could still be around the truck and enjoy learning about it. He was excited by my offer and told me about his plans to fix it up. His plans were the about the same as most teenagers when they get their first car. You remember what that was like, don't you? :-)
All he needed now was a job so he could earn enough money for the parts.
My Convoluted Purchase
As it turned out, the job to buy parts seemed more than Frank was able to handle with his schoolwork and all. He was nearly 16 and had plans to drive it back and forth to school. His dad suggested they sell the truck and buy Frank something more practical. I know what your thinking, "How could anything be more practical than a Willys truck?" Well, his dad was thinking more along the lines of gas mileage and multiple passengers. Frank finally agreed to his father's wishes and set the date to sell me the truck as Dec 18 1997. His dad was out of town on business and that was the day after he was due back from his trip. It was now October and the selling price was set at $1,500. I'm not a wealthy man. At best I'd be considered lower middle class, so the money wasn't easy for me to come up with. I skimped and saved to make sure I had enough money to buy it on that date. As the fates would have it, Frank got his driver's license on the 15th of Dec. By the 18th he was completely infatuated with his truck and he had decided not to sell it. He backed out on the sale, with the promise to give me the first shot at it, if he ever did decide to sell it. I was devastated but I told him I understood. I think my loss thrilled my wife, since she was more than happy to spend the money I had been saving on our children for Christmas.
As often happens with infatuation, Frank's quickly turned cold. The truck had no heat or defrosters. It would flood and die leaving him stranded. Most of the time the windshield wipers didn't work. Worst of all, I don't think his friends understood what a wonderful piece of history he was driving. I think they made fun of it and when you're 16-years-old that's pretty hard to take. I was on a business trip to Enid OK in Mar of 1998 when I got a call from Frank. He said the truck had broken down again and that he wanted to sell it. I DIDN'T HAVE THE MONEY! I explained to him my dilemma and he said he didn't mind waiting for me to raise it. He said he realized how much I would appreciate the truck and that he didn't want anyone to have it but me. He told me to pay him when I got the money and he let me take the truck home. A thought occurred to me about this time, I had agreed to buy the truck and I had never driven it. I was running on blind desire instead of thinking things through. My loving wife turned over her share of our income tax return and I bought the truck in May. It was mine!
The truck was a white on Champaign, 1962 Willys 4WD (4 Wheel Drive) Pickup. Unfortunately, the original L-226 flat head, straight six expired in 1981. A 1978 Chevy 350 V-8 crate motor with a four-barrel Quadrajet had replaced it. The V-8 was connected to the T-90 three-speed transmission via an Advance Adapters bell housing. Hanging off the back of the tranny was an ailing Spicer, Model 18, transfer-case with a WARN Overdrive. Under the front springs sat a Spicer 25 axle, and bringing up the rear, was a heavy-duty Dana 53 axle. Both axles have 4.27 ring and pinion gears.
The factory seats had been replaced with a set of, worn out, Corvair bucket seats. The rubber boots for the tierod ends were only being held on by a whisper. The cracked seals on the steering knuckles had been devoid of oil and grease for years. The felt seals, that once directed air into the radiator, had surrendered to mother nature so completely that only a small circle of felt was left to bear witness to their existence. The windshield wipers and emergency brake had given up all hope of operation. In short most accessories were looking pretty rough.
Having said this, I must also admit that physically and mechanically the truck was reasonably sound, it only suffered from a few emotional difficulties. The engine had good compression and didn't leak too badly. The tranny, Overdrive, and axle assemblies were tight although leaky. The T-case whined like a little baby but it seemed to work fine. The body sported a little surface rust but no holes and the frame was solid as a rock. Overall I thought it was Cherry. :-)
Back to the Vacuum Powered Windshield Wipers
The vacuum wiper motors and the drive assemblies had been replaced by two sickly 12 volt wiper motors. When they worked, and that wasn't often, they drove at different speeds. They really looked stupid, swinging back and forth at their own pace. An original style wiper motor and drive cable assemblies were what it needed. This might have been a bit tough had I not run into a streak of good luck. A local junkyard had a 48 Willys wagon carcass sitting there that had been stripped of everything except the wiper system. The proprietor sold me the complete setup without a warranty for $20.
The whole system bolted right in and the cables seemed to operate fairly smooth. Installation only took about 1/2 hour once all the parts were cleaned up. After removing the mud daubers nest from the bottom of the motor it was disassembled cleaned and oiled. It worked for about the first 3 weeks and then I had to open it back up again to lube it some more. Eventually I found that a few drops of auto tranny fluid into the holes about once a month made it work most of the time.
Update:
The old wiper motor finally gave out when I installed new blades and arms. The springs were too strong for the sickly old motor to drive. I had two bad wiper motors and both really looked rough. I sent them to Ficken Wiper Service to have rebuilt. They don't just send you another wiper motor, they rebuild yours with all new soft parts. I sent them both motors and told them to rebuild the better of the two. I said they could keep the spare for somebody else that might need a core. It took about 3 weeks to get it back. It looks like new, came with a 3 year warranty and man does it work great. I just thought the wiper motor worked well before. These blades wipe right along and do a wonderful job, even with the new wiper arms and blades I installed. I highly recommend these guys.They taught me a few things about this motor. One thing is that it takes 11 inches of vacuum to drive a wiper-motor. If your engine isn't' producing enough vacuum, it can't drive even the best wiper-motor. In addition the motor has a second vacuum port on the passenger side. This isn't for input vacuum; it's for output vacuum to a vacuum operated windshield washer assembly. This was never used on the trucks and wagons. When the knob is turned on all the way and held, it pushes in a small plunger on the motor that activates this port. Once you release the knob a spring on the plunger pushes the switch back and closes the port.
Homebuilt Defrost and Heating System
When the electric wiper motors were installed they were larger than the stock wiper configuration. This increased motor size located them where the defrosts ducts were supposed to go, so the previous owner removed the ducts. He installed an after-market, magnetic, stick-to-the-dash, electric defroster. It served as both the defroster and heater for the truck.
The combination heater control switch and cable assembly was broken and the original heater box was missing down to the blower motor box. Many long hours were spent in junkyards looking for a replacement heater box, but I was unsuccessful. The wagon I had located earlier used a center-mounted heater instead of a right side mounted heater. Eventually I settled on a heater box from a 71 DJ US Mail jeep. It wasn't a perfect fit but I could make it work. As is usually the case, three days after I bought that box the junkyard search was on again. This time a fuse box block was the "Holy Grail" I was trying to acquire. Willys didn't have fuse blocks so I was looking in other types of vehicles. Low and behold, I opened the door of a 1964 GMC Pickup and look at what I found. The heater box had been pulled and thrown on the floor. It was a perfect fit for my truck. It had a lever for diverting the air from floor to defrost or both. I had never thought to look in a GMC Pickup for the heater box. A fuse block yes, a heater box no. Oh well, live and learn.
At a later date I had to pull my heater core (story later) and found that the blower motor housing was welded (very sloppy stick welds) to the heater core box. This leads me to doubt that this assembly is original for my truck, but it works great and I'm not going to complain. Heater box installed; I still needed the ducting to my defroster vents. Every parts place in town was called and but to no avail. Compounding the dilemma, the vents coming out of the heater box were 2 +" round and the defrosts vents were 1 3/4" oval. Custom made ducting seemed to be my only solution. The vents and heater box were removed from the truck and connected together with rolled up newspaper to form a mold. Using black (Any color will do, but black looked more original) duct tape backwards (sticky side out), I wrapped the entire mold. Next I wrapped the entire mold from one end to the other with bailing wire at about 1/2" intervals. Then I repeated the duct tape wrap sticky side down this time, sandwiching the wire between the two adhesives. I carefully pressed the two pieces of tape together over the entire mold to ensure adhesion. The vents and heater box were removed from the ends. Then it was pretty easy to pull the newspaper out of the duct. It worked perfectly and to the uninformed eye these flexible ducts look stock.
Update: Two years later the ducts are still working but the Texas heat is starting to get to the glue in the tape. I used a good quality tape so that isn't the problem. I think I will try to make them again but I will use brown paper and rubber cement next time. Next Update: I got up this morning and the defrost was totally out. The blower was running but the ducts had collapsed from the inside. If you've ever seen old duct tape you will know what it looked under the dash. Since I needed defrost for my truck I had to come up with something that would work better and hold up longer. I went to a few hardware stores looking for tubing to do the job but nothing was working out. As I was leaving my favorite hardware store (Sipples in Universal City TX) I noticed some corrugated tubing on the top shelf. A closer inspection found that it was 2 1/2" Bilge Pump output hose. This hose was a perfect fit to the upper ducts and a short section of custom work with some duct tape adapted the hose to the large openings on the heater box. The hose only came in a 24' package so I have plenty left over to redo the job any time it might go bad. It looks like pretty tough stuff so I figure that would be never. After this quick repair my defrost works better then ever.Defrost ducts wouldn't help much without an operational blower. The heater control switch and cable were removed for repairs. The fresh air cable was broken off at the back of the switch and the switch contacts for the blower read open all of the time. very carefully I bent out the tabs on the back of the switch to disassemble it. It was cleaned, and the contacts filed before it was reassembled.
I made a mistake in assembly and failed to ohms check the switch contacts to ground. When I installed the switch and turned the key on, the wire from the ignition switch to the heater switch smoked. Darn, back to the drawing board. When I took the switch apart again I found that the insulator block was installed backwards. It was turned over and the switch worked great.
The fresh air cable still needed to be attached the vent control. Purchasing an after-market choke cable, I cut the handle off it. Attaching the new cable and housing to the switch proved a challenge. The original cable was fed into the end of the switch handle and crimped through a small hole. To remove the remains of the old cable it was held over a gas flame until it became red-hot. A quick tug and it came partially out of the handle. Repeating the procedure completed the job. Next I cut and ground two steel pins made to fit the cross drilled hole in the switch shaft, one at the top and one at the bottom. I wish I had taken a picture here. This is where a second person would have been handy. Putting one of the pins in my vise facing up, I inserted the new cable into the handle and heated the cable until it was red-hot at the hole. Quickly moving from the flame to the vise, I flared the cable with a sharp rap from my trusty hammer on the top of the other pin. This flare allows the cable to rotate inside the handle shaft when the switch is turned.
The switch housing was originally crimped onto the cable housing and that part of the switch was broken off. Since function was more important that aesthetics, the cable housing was butted up to the switch and the two were attached using a large aluminum cable stop. Not very pretty, but very effective. The truck now has both heat and defrosters.
Rebuilding the Emergency Brakes
This was the final piece I needed to get the truck inspected. The emergency brake cable had maintained its stock routing and when the V-8 was installed the cable was left rubbing the exhaust manifold. The manifold burned the casing off of the cable housing and allowed water to get inside to rust the cable. The cable would still move some but not much. I removed the cable and found a place in town that promised to make me a new cable 12" shorter to correct the routing problem. When I went back two days later they said they were sorry but they couldn't get the parts to do the job. They were able to clean up my old cable and cut it down. They had to braze a collar around the end of the cable housing to match the mounting bracket. It fit and operated properly so I was more than satisfied.
Since I was in the area, I also removed the e-brake bell crank assembly for cleaning and lubrication. When the ends fell off the assembly I thought it was broken, but after I removed the bat guano, (I know it really wasn't but it sounds good) I was able to determine that they were supposed to come off that way. This assembly sure could use a grease fitting installed so I might add one later. With everything back together the emergency brake can stall the truck if you try to start out in any gear but reverse and it will lock up the back tires at 30MPH.
All right! It passed inspection the first time. The guy at the inspection station was a little intimidated by the four different gearshift levers but once I explained their operation he was OK. He did fill out my inspection sheet with the name Willie's. Oh well, you can't have everything.
Self Opening Doors
The day after I had the truck inspected, I was driving my oldest daughter to school in it. As I took the first left turn the passenger door flew open. The seat belt held her in, but she wasn't amused by the idiosyncrasies of my new truck. To this day she still doesn't like my wonderful truck. An inspection of the door latch revealed that the cam gear inside the latch was worn-out so a new latch was in order. Good luck finding one. I called every junkyard in town looking for that latch and nobody had one. As a last resort (I know it should have been my first) I turned to the Internet. I talked to some guys on alt.rec.autos.4x4+willys (this is a newsgroup, not a web site) and they pointed me few parts houses. With their assistance I a new after-market latch for $90. At these prices it would cost me a fortune to put this truck together right. Then I stumbled across
Rick Grover's parts web page and my luck turned around. After calling about 8 different people on his list of suppliers I found a guy that had a used door latch for $23. He said it was as good as new so I bought it. Disappointed greeted me when I first opened the box because the latch was covered in dark green paint and tons of grease. Yuck. I spent about a half-hour cleaning the latch with brake cleaner and carefully lubricating it. When I was done it really was just like a new latch. It was an original part was of much heavier construction than the after-market one I pulled out. Once it was installed the door longer popped open on it's own accord but it still rattled a lot. Further examination revealed a worn latch post. This time I was lucky enough to find a set of latch post on a Nash Metropolitan that fit. The only difference was that the latch plate on the Nash narrows down at the bottom. My passenger side door now fits snug.
Lock Me Up
While I had things apart I decided to have a go at the passenger door lock. I took the assembly to my buddy Keith. He happens to be great at picking locks. In less than 5 minutes he picked the lock and removed the cylinder. The lock cylinder made a quick visit to a locksmith in less than a half-hour I had a key made for it. Keith quickly reassembled the lock and I put it back on my truck. Now I can lock my truck. Unfortunately I don't have a lock cylinder in the driver's side door handle. I bought two of these handles hoping I could put one good one together but alas no luck. They were too corroded to use.
Where Did My Interior Go?
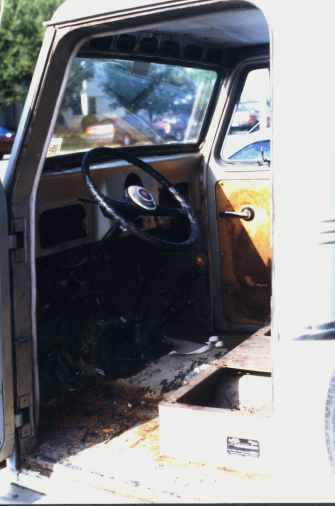
I really don't know how this happened. One day I was out front looking at the truck to see what it would need next. The next thing I know, I had the seats out, the carpet ripped out, and the entire dash stripped. It just happened. It wasn't planned; it was just that one thing lead to another and wham there I was staring at a stripped interior.


Preventing the Flintstones Syndrome
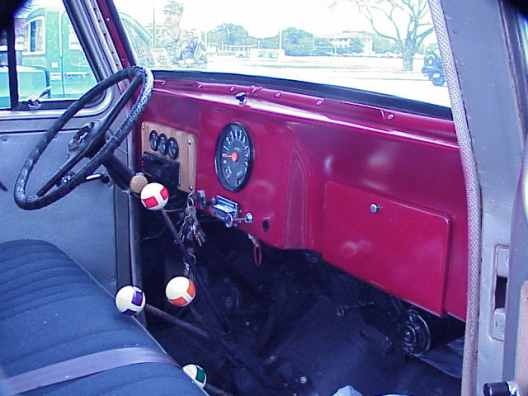
As it turned out the stripping of my interior was a good thing. The carpets that were glued onto the floor boards where holding water. There was only one small hole rusted through, but the right floor pan was heavily pitted. If you look carefully in the pictures above you can see the rust. The floorboards were sanded down and treated them with a rust preventative. Then they were sprayed with a rock and scratch guard, followed by six coats of flat black enamel. The carpet is being left out, until I can get all of the water leaks fixed. I don't really think I'll ever put it back in. Willys just weren't made to have carpet in them. :-)Dark fire engine red paint was the color I wanted my truck to be (Remember what I said earlier about teenagers and their dreams). The dash was carefully sanded down and shot with this glorious color. This job was simplified by a sample that I have of a product called X-it, manufactured by the Fortune Chemical Company. This stuff is a water-soluble cleaner that also acts as a surface conversion for paint prep. With minimal cleaning efforts I got wonderful adhesion with no fisheyes. Unfortunately, it is only sold by the 55 gal drum at this time, but hopefully one day soon they will market it in smaller quantities.
 The paint looked great until my daughter kicked it with her foot the day
after I painted it and scuffed the finish. Oh well such is life. Accidents will happen.
While they were out the steering column, turn signal switch and speedometer trim got a
fresh coat of black paint. Sometime in the distant past, the speedometer glass had been
broken and replaced with a piece of Plexiglas. The Plexiglas had turned yellow with age so
I went to a glass shop and had them cut me a new glass plate. The speedo looks brand new
at first glance now. You have to look close at the dial face to see the age cracks.
The paint looked great until my daughter kicked it with her foot the day
after I painted it and scuffed the finish. Oh well such is life. Accidents will happen.
While they were out the steering column, turn signal switch and speedometer trim got a
fresh coat of black paint. Sometime in the distant past, the speedometer glass had been
broken and replaced with a piece of Plexiglas. The Plexiglas had turned yellow with age so
I went to a glass shop and had them cut me a new glass plate. The speedo looks brand new
at first glance now. You have to look close at the dial face to see the age cracks.
Steering Column Woes
Removing the steering column was necessary to get to the floorboard on the driver's side. Along with the new engine had come a Saginaw steering modification. When I removed the column, its ball bearings fell out and went everywhere. Many years before, the bottom bearing retraining clip had failed to hold the bearings in and the chewed up pieces that were left behind looked pretty sad. Since I had no idea what type of vehicle this column came from I was in a pickle. How would I locate a bearing for it? After about a week of unsuccessful searching I came to the conclusion that I was not going to find this bearing. After examining the top bearing assembly I realized the bottom bearing could be rebuilt if I could just find the right size ball bearings to replace the old missing ones. A bicycle shop was where I finally found them for a total of $1.40. With this hurdle taken care of the rest of the installation was easy. My only problem is that I replaced the broken flat C clip in the column with a C clip with ears. I didn't think about it at the time but now every time the wheel is turned it makes a click-click-click as the ears catch on the steering wheel spring. One day the wheel is going to have to come back off to fix this.
Sealing the Brake and Clutch Pedals
Since I had the steering column out, this was an excellent time to seal the clutch and brake pedals. I removed the two plates that surround the pedal arms. These plates made wonderful templates for the new seals. I wasn't sure what to make the seals out of, but I eventually decided to make them out of rubber. I went to a local tire store and they gave me an old semi truck, inner tub that was beyond repair. I laid the templates on top of the inner tub and cut out the new seals using a pair of scissors and a set of gasket punches. It as a little difficult keeping everything in line while the seals were bolted it but with a little perseverance I succeeded. I decided it would be prudent to keep the seals and pedal arms lubricated so the seals wouldn't tear.
Update:
Two years later the brake pedal seal is still fine but the clutch pedal seal is ripped to shreds. The bushing for the clutch pedal is worn out and allowing too much side to side swing of the shaft. After I replace the bushing, the seal should hold up. I'll keep you posted.
Air and Ventilation Controls Ooops
My early ignorance of Willys Trucks reared its ugly face when it came to the heat and vent controls. There was a bracket at the bottom center of the dash that had three holes in it. Only one of these was used by a heater control and the others where occupied by the old defunct electric wiper motor switches that had been replaced by the later defunct toggle switch. This bracket made it difficult to reach the top mounted vent door lever. The bracket was pulled the heater switch was moved to where the old choke cable had been. Later that I found out that this bracket was factory. One cable switch controlled defrost/floor heat, one controlled heat on/off, and the other controlled the blower and front vent. I will work to correct my earlier mistake by reinstalling these parts when money permits.
Radio Installation
No, I don't believe my Willys came with a radio but the previous owner saw fit to install one in the dash. Fortunately he didn't cut any holes in the dash to do this. Instead he removed the left dash panel cover and tossed it. Darn. He made an aluminum plate with the stereo holes cut in it and screwed it on in place of the cover. The craftsmanship was poor, and the installation was very ugly. The old stereo had a bad habit of making a very loud buuurrriiipppp sound when you turned off the engine. This could be very embarrassing in the wrong company so I bought a new one. I had an interesting time trying to explain to my wife why the stereo was keeping the truck from running. A new cover plate for the dash was made from
some left over oak I had laying around and it really looked nice. I finished it front and
back with seven coats of hand rubbed Tung Oil. I also cut holes to install some new engine
gauges. It was a close fit but it all went in beautifully. Unfortunately the glue in the
panel could not stand up to the TX heat and it cracked about two weeks later along the
glue lines.
A new cover plate for the dash was made from
some left over oak I had laying around and it really looked nice. I finished it front and
back with seven coats of hand rubbed Tung Oil. I also cut holes to install some new engine
gauges. It was a close fit but it all went in beautifully. Unfortunately the glue in the
panel could not stand up to the TX heat and it cracked about two weeks later along the
glue lines.
Glove Box Made From Scratch
The factory cardboard glove box was replaced many years before with an aluminum one. It was crooked, ugly and too big. Every time the truck hit a bump, the box would bang on the inside wall of the cab. Deciding to fabricate my own box, I used black felt glued to cardboard. It turned out pretty good. Later when I went to the Pomona Swap Meet, I ran into a vender that sold all different sizes of glove boxes made from original materials. Sadly, I didn't remember what size I needed and I didn't get a name or address for him. The current box works good but I'd like to have a better one.
Update:
The box is still holding up but it has sagged pretty bad from water damage caused by the leaking windshield. In truth a think that even a stock original box would have failed if subjected to water. :-(Denim Shifter Boots
As many of you that have Warn Overdrives know these things were not factory and as far as I know there isn't an after market shifter boot available for these four shifters. A junkyard trip easily produced a shifter boot ring to fit the tranny shifter, but for the other three I had a challenge. Eventually I made the second ring (actually it was more rectangular shaped) from stainless that started at the side of the tranny shifter ring then dropped down, came forward, then back up and over to the front side of the tranny ring. For both rings, I made duplicate rings from stainless to sandwich the shifter boots between. Four separate shifter boots were fashioned from black denim. Each boot had four triangular sides forming a pyramid. Once the four boots were finished I sewed them all together into one long boot assembly. The boots were sandwiched between the rings and then I mounted boot assembly to the tranny cover plate. The tranny cover plate had been installed and removed so many times that the holes in the sheet metal were stripped out. To repair this I drilled the holes out larger and installed nut plates under them to make installation and removal easier. The whole assembly was bolted into the truck using stainless steel hex head bolts. I have had several people say they thought it looked factory. But some of you guys could never be fooled.


The Corvair bucket seats had to go. They were too big for the truck, green and ugly. The problem is what would I replace them with. Looking around the cheapest I could find original seats for was $500. The $500 seats still needed to be reupholstered. This was more that I could afford to spend at the time. The Willys Wagon in the junkyard still had its seats but there wasn't much left of them. They could be used as a pattern but that was about it and the guy wanted $20 apiece for the rusted, broken frames. I finally decided (Note that I have been putting more thought into the repairs than I did the original purchase) to buy a good junkyard seat to go in it. With my truck's measurements in hand I and headed out again. A bench seat from a 1985 Chevy S-10 was almost a perfect fit.
 The one I bought was apparently reupholstered just before the engine in
the truck died. The local pick and pull let it go a measly for $20. It looks good in the
truck but it still sets about 4" too high for my taste. When I do my frame off I will
invest in the original seats.
The one I bought was apparently reupholstered just before the engine in
the truck died. The local pick and pull let it go a measly for $20. It looks good in the
truck but it still sets about 4" too high for my taste. When I do my frame off I will
invest in the original seats.
Update:
I have acquired an original set of seats for my truck. They are in pretty rough shape but my local upholsterer assures me that he can rebuild them for $200. For the time being they have been sealed in plastic and put into storage. When I get a place to do the restoration the seats will get done too.
The previous owner had seen fit the reupholster the door panels with a silver vinyl. Laying around my basement were some oak and ash scraps. I decided to make new door panels from them. The pieces were trimmed down to a fairly uniform size, stager glued together and plained them down to 3/16". They made a great butcher-block effect but I was afraid to put them in until the weather cooled. I also have made a set of matching kick panels to cover the left and right kick panels.
Update:
The kick panels were dumped in the trash after the basement flooded so I have to make new ones. My door panels are still waiting for me to install them.
Nasty Dana 25 Front Axle Assembly
I was pleased when I pulled the front differential cover off. There were no metal filings and no discernible free play. The Ring and pinion gears looked new. Eventually I will need to pull out the complete axle assembly and disassemble it. Then I will put in new bearings and inner seals. The front steering hubs were a little worse for wear. The hubs had run dry of lubricant many years before. The seals were cracked and missing large hunks. I disassembled the each hub, cleaned and inspected each one. It took me far more time to clean off the crud that was caked on than to take it apart and put it back together. The passenger side displayed no wear, but on the driver side, the hub ball was badly scored. I sanded the scored area, then installed new seals and lubed with 90-weight gear oil.
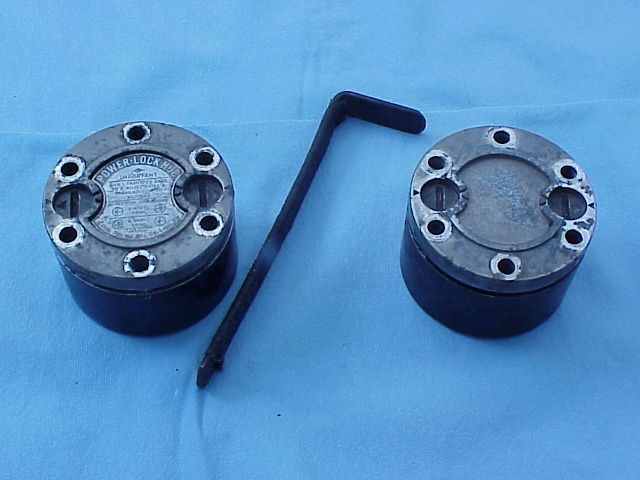 The locking hubs are of a design I have never
seen before. They require a slotted tool to engage them.
The locking hubs are of a design I have never
seen before. They require a slotted tool to engage them.
Update:
I have since found that they are Cutlass Power Lock Hubs and I created a web page that goes into great detail on how to rebuild these hubs. Update: I spent a day going through the front axle. It was in very good condition. The entire axle housing was carefully cleaned but the gears were left installed. After I was sure that I had everything clean I painted the ring gear with a blue dye. With the truck up on in jack stands I ran the axle both forward and reverse. After shutting the truck down I found that the gear marks indicated a properly setup ring and pinion. Since everything was good, it was all put back together with new seals and put back on the road.
Steering Hub Lube?
The 90-weight gear oil does not stay in the steering hubs. With all new seals it still leaks out. The main problem is the top and bottom kingpin shims are stainless steel shims and they don't have any gaskets on them. You can try spraying a sealant on them when you have it apart but it still doesn't work. Both sides constantly leak from the top and bottom. It takes about 2 months to leak it all out but it leaves a nasty mess on the driveway. It also makes the inside of the tires look gross. The maintenance manual calls for a universal joint lubricant no 1 for summer use and universal joint lubricant no 0 for winter use in these hubs. I have contacted everyone I can find and nobody has ever heard of this stuff. I have been thinking about replacing the oil with grease but for now I will just keep looking.
Update:
Since I logged onto WillysTech I have found that most folks make "knuckle pudding" to go in their steering knuckles. You start with a one-gallon can of ordinary yellow/green wheel bearing grease. Slowly add 90-weight gear oil while stirring. You are trying to get a mixture that will just start to hold a peak when the stir stick is removed. Knuckle pudding will not leak from the steering knuckles but it provides enough movement to keep fresh lube in the king pin bearings. Since I put it in I haven't had one drop leak out and my steering knuckles are doing great.
Steering Box Changed
When I had the axles removed I found the steering would turn all the way both directions to engage the steering stops. Once the axles were installed, the steering fell about 8 degrees short. I will have to look into this more later.
Update: The Spicer cross bar axles will work as a replacement for the old style axle shafts for they don't have as tight a turning radius as the originals. I'm going to look into fixing this if possible.
Repainting the Rear Frame
It happened again. I don't know how it happened, but just like with the interior, I went out to just look at my truck, and before I knew it, I was standing there with the bed removed. The rear frame rails looked very solid with only minor surface rust to contend with. I sand blasted the rust off the rear frame, primered, painted and then under coated it. It looks wonderful from the cab back. I felt I needed to do this to protect it from rust for the next two years. When I move back to NC I will do a complete frame off reconstruction. In the mean time I want to get some cheap paint on this thing to protect it. I've noticed that every time I remove a body panel it has numerous stress cracks. This is probably due to the bad springs and bushings so I want to correct this soon.
Update:
It doesn't look like I'm leaving here for another 3 years so a total restoration will again have to wait.
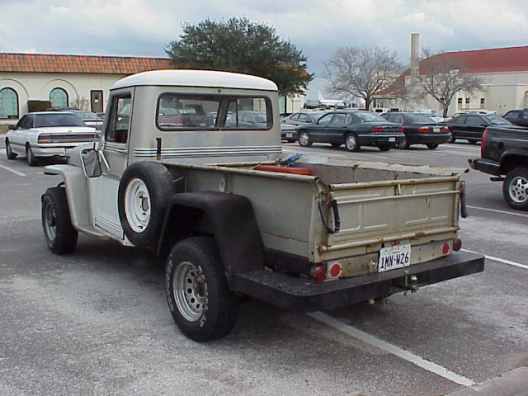
U-Shaped Tailgate
The tailgate has a visible bow in it from having heavy items sitting on it while in the down position. I've considered several options to have it straightened. I would probably leave it alone but it is bent to point that it rubs on the tailgate supports that are welded to the rear frame. This rubs the paint off the tailgate. My current plan is to make a set of wooden wedges to brace on the tailgate supports and then lower the gate. I believe this with bend it into shape.
Bad Front Tire Wear
I have recently noticed some tire wear. They aren't wearing evenly. It almost looks like they are cupping so I need to fix the front springs and shocks. This is the first vehicle I have ever bought that didn't need tires as soon as I bought it. The first question my wife asked me after I bought it was "How much are the tires going to cost?" She was elated that it didn't need any.
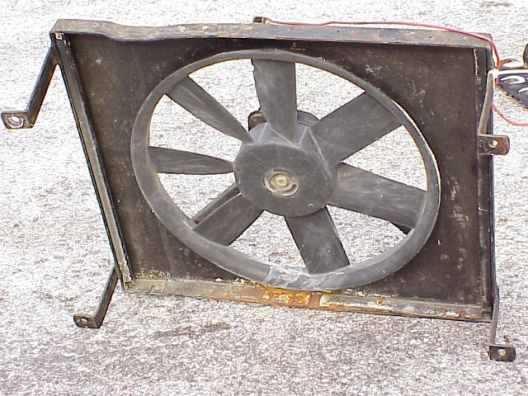
Update: I looked at the front end again and found that the tires were wearing due to the front left bearing nuts working loose. I tightened the nuts and rotated the tires. There has been no sign of wear for the last two thousand miles. I am planning to drill safety wire holes in the nuts and locking washer so I can lock-wire them in place. I believe this will work better than bending the lock washer and is more easily reused. Next Update: The washers in my front hubs were about twice as thick as they were supposed to be. I bought new ones from Carl Walck and they bent over just fine. I also replaced the tie-rod ends and straightened the bar that runs from one hub to the other. It was bent pretty badly. I cleaned everything up put in new Knuckle Pudding. The new seals took care of my leaks. Update: 28 Sept 2000 It's been about a year since I fixed the tie rod ends and tighten the nuts in the hubs down. There has been the normal tire wear but nothing like I saw when I first bought the truck. I will need to replace the tires in the next few months and I'm going to go back to the original rims at that time.Fan Shroud As I stated at the beginning of this dissertation, the truck was over heating when I bought it. It only did this when setting at idle speed. An inspection revealed that the felt strips were missing from the front. These strips help guide air into the radiator. I replaced the felt strips but the engine still ran over 250 degrees. To make sure this temperature was accurate, I decided to change the temperature sensor. Now the temp ran about 230 degrees (seems I was right about the old unit). It appeared that the electric fan was drawing air from behind the radiator instead of through it because it had no fan shroud. In an effort to improve the situation I made a homemade fan shroud so the air would be forced to flow through the radiator.
 This dropped my idle temp down to 200
degrees but caused my highway temp to also be 200 degrees (It had been around 180). Turns
out the flat corners of the fan shroud are causing the airflow to drop at highway speeds.
I'm planning to purchase a Perma-Cool high performance 16" fan. It
moves 2950 CFM of air and requires no fan shroud because of the design of the new blade. A
high performance 350 Chevy requires a minimum
of 3000 CFM to stay cool but since mine is actually pretty mild it shouldn't be a problem.
This dropped my idle temp down to 200
degrees but caused my highway temp to also be 200 degrees (It had been around 180). Turns
out the flat corners of the fan shroud are causing the airflow to drop at highway speeds.
I'm planning to purchase a Perma-Cool high performance 16" fan. It
moves 2950 CFM of air and requires no fan shroud because of the design of the new blade. A
high performance 350 Chevy requires a minimum
of 3000 CFM to stay cool but since mine is actually pretty mild it shouldn't be a problem.
Update:16 May, 1999
. Purchased the PermaCool Fan from JEGS automotive. Total cost with shipping and handling was just under $96. I removed the old fan today.
 It had good clearance between it and
the water pump, but it didn't move enough air. As stated earlier the box style fan shroud
blocked more air than it moved.
It had good clearance between it and
the water pump, but it didn't move enough air. As stated earlier the box style fan shroud
blocked more air than it moved. 
 With the old fan removed it is much easier to see how much room
there is for the fan
With the old fan removed it is much easier to see how much room
there is for the fan  and also why an engine mounted fan will not work very well on
this engine installation. The frame cross member would be in the way. This PermaCool fan
can be used in a pusher or puller installation. If it is used as a pusher fan it looses
20% of its airflow. I temporally installed it in the pusher configuration, for those that
are interested in doing that, to see if it would fit.
and also why an engine mounted fan will not work very well on
this engine installation. The frame cross member would be in the way. This PermaCool fan
can be used in a pusher or puller installation. If it is used as a pusher fan it looses
20% of its airflow. I temporally installed it in the pusher configuration, for those that
are interested in doing that, to see if it would fit.  There was plenty of extra room. Note
that the fan sits off to the right when viewed from the front. That is because the
radiator and the original L-226 was offset to that side. If I were to permanently install
my fan in front of the radiator I would paint it black so that it would be less visible.
There was plenty of extra room. Note
that the fan sits off to the right when viewed from the front. That is because the
radiator and the original L-226 was offset to that side. If I were to permanently install
my fan in front of the radiator I would paint it black so that it would be less visible.
Although the PermaCool fan fit my truck fine as a pusher, I'm not sure there would be enough room for it on pre 1953 trucks because of the flat grill
.There were a few problems I encountered during my installation. First the mounts for the fan did not want to push through the radiator. A trip inside the engine compartment provided me with a look through my radiator. This allowed me to see the tubes are staggered so the mounting strips could not fit straight through. They had to be inserted at an angle to miss the tubes. I installed the first strip and then fit the others one at a time without installing the final locks. There are eight rubber cushions that fit under the mounting strips to prevent damage to the radiator fins. The instructions recommended buying a heavy-duty installation kit for 4X4 use but since my truck seldom sees the trail, I decided the stock mounts should work. They install like zip ties and can be seen in this picture
 . When I first turned on the key, I was a little concerned to see
how much air it moved. It didn't seem to be moving any more air than my old fan did. Then
I remembered that I had a weak battery and started the truck. Now I could feel the air
flowing from in front of the grill. With the old fan I used to have to burn something to
watch the smoke be pulled in, but not with this baby, she really sucks some air. Here are
some other pictures I took of the PermaCool fan installation.
. When I first turned on the key, I was a little concerned to see
how much air it moved. It didn't seem to be moving any more air than my old fan did. Then
I remembered that I had a weak battery and started the truck. Now I could feel the air
flowing from in front of the grill. With the old fan I used to have to burn something to
watch the smoke be pulled in, but not with this baby, she really sucks some air. Here are
some other pictures I took of the PermaCool fan installation.

 . I will have to wait for a really hot day to make sure I have my
problems fixed, but so far she hasn't moved above 160 degrees. This may force me to
install a 180-degree thermostat so the temp will rise the rest of the way up to operating
temp. I still need to mount my fan temp switch and properly route all of the wires but it
seems to be working fine right now.
. I will have to wait for a really hot day to make sure I have my
problems fixed, but so far she hasn't moved above 160 degrees. This may force me to
install a 180-degree thermostat so the temp will rise the rest of the way up to operating
temp. I still need to mount my fan temp switch and properly route all of the wires but it
seems to be working fine right now.
Update: 28 Sept 2000
I decided not to run the fan switch. It really isn't needed here in San Antonio. Instead the fan is just allowed to run all the time the truck is running. The truck ran fine all summer but is still starts pushing 210 degrees on a hot day above 60 MPH on the highway. I think I'm going to have a custom radiator build for it. Not long after the truck returned to the road it started to flood out. It was really a pretty ugly site. While I was driving, the truck would die. When I got out to look, the carburetor would be leaking gas from every seam. I was afraid it would catch fire. The only thing for me to do was to rebuild the carb. I bought a rebuild kit and a Rochester rebuild manual. It took me a few days to read it and carefully study the operation of the Quadrajet but when I was done I felt that I was ready to tackle the job.In the end it took me less than 4 hours to disassemble the carb, clean everything carefully and reassemble the carb with new parts and gaskets. Whenever I removed something that had an adjustment I would screw the adjustment all the way in while counting the turns. Then I would record the number of turns for readjustment when assembling. When I was done the carb worked great and it never flooded again.
In June of 1998, I discovered two Willys Pickups for sale in Asheville NC. I had no way to go get them so I had to leave them there. Eventually the guy (Alienxxxx) that was trying to sell the trucks gave up and sent them to the junkyard. Before they went he asked me if I wanted any parts from them. This is what I got.
2 outside door handles
2 door latches
2 door post
1 hook ornament
4 headlight trim rings (I've already given two away)
1 sun visor
1 horn button
1 front drive shaft
2 front parking lights
1 complete vacuum wiper system
I didn't get the rear drive shaft because both trucks had Timken axles instead of the Spicer 53 that my truck has. The two outside door handles proved to be too far-gone (He told me this in advance) but the rest of the stuff looks pretty good. I paid $75 for the parts and $17 shipping and handling.
You can find the rest of my web pages hereBackground created by Richard Grover and used with his permission. http://www.public.asu.edu/~grover/willys/ |